

15 Apr How to Transfer Image from Android to iPhone – Complete Step-by-Step Guide
Changing phones is exciting, especially when moving from Android to iPhone. Many users upgrade to iPhone for its camera quality, smooth performance, premium design, and ecosystem. But one common question people ask is:
How to transfer image from Android to iPhone?
Photos are valuable memories. They may include family pictures, travel moments, work files, screenshots, videos, documents, and important personal memories. No one wants to lose these while changing devices.
The good news is that transferring photos from Android to iPhone is easier than many people think. Whether you have 100 photos or 20,000 images, there are multiple safe ways to complete the process.
In this complete guide, we explain how to transfer image from Android to iPhone step by step using the easiest and best methods.
Best Ways to Transfer Images from Android to iPhone
You can move photos using:
- Move to iOS App
- Google Photos
- Computer Transfer
- Cloud Storage
- WhatsApp / Telegram
- USB Cable Transfer
- Manual Selective Transfer
Let’s understand each method.
Method 1: Use Move to iOS App (Best for New iPhone Setup)
If your iPhone is brand new or reset, Apple provides an official method called Move to iOS.
Best for:
- New iPhone users
- Full gallery transfer
- Contacts + messages + photos transfer
Steps:
Step 1:
Turn on your new iPhone.
Step 2:
During setup, choose Move Data from Android.
Step 3:
Download Move to iOS app on your Android phone from Google Play Store.
Step 4:
Open app and enter code shown on iPhone.
Step 5:
Connect both phones to WiFi.
Step 6:
Choose Photos / Gallery.
Step 7:
Wait for transfer to complete.
This is one of the easiest answers to how to transfer image from Android to iPhone.
Method 2: Transfer Photos Using Google Photos
Google Photos is one of the most popular solutions.
Steps:
Step 1:
Install Google Photos on Android.
Step 2:
Backup all photos.
Step 3:
Install Google Photos on iPhone.
Step 4:
Login using same Gmail account.
Step 5:
All backed up photos will appear.
Benefits:
✔ Wireless
✔ Safe backup
✔ Easy access
✔ Great for large photo libraries
Method 3: Transfer Images Using Computer
If you prefer manual control, use PC or laptop.
Steps:
Android to Computer:
- Connect Android phone via USB cable.
- Open storage folder.
- Copy DCIM / Photos folder.
Computer to iPhone:
- Install iTunes or Finder (Mac).
- Connect iPhone.
- Sync photos to iPhone.
This method works well for users asking how to transfer photos from Android to iPhone without internet.
Method 4: Use Cloud Storage
Apps like:
- Google Drive
- Dropbox
- OneDrive
can help.
Steps:
- Upload photos from Android.
- Install same app on iPhone.
- Download images.
Useful for selective transfer.
Method 5: Send Images Using WhatsApp or Telegram
For smaller quantity photos:
- Create self chat or use saved messages.
- Upload images from Android.
- Open same account on iPhone.
- Download images.
Good for quick sharing.
Method 6: Transfer Select Photos via Nearby Computer
If you only need selected images:
- Copy to pen drive
- Use laptop
- Email selected files
- Use AirDroid
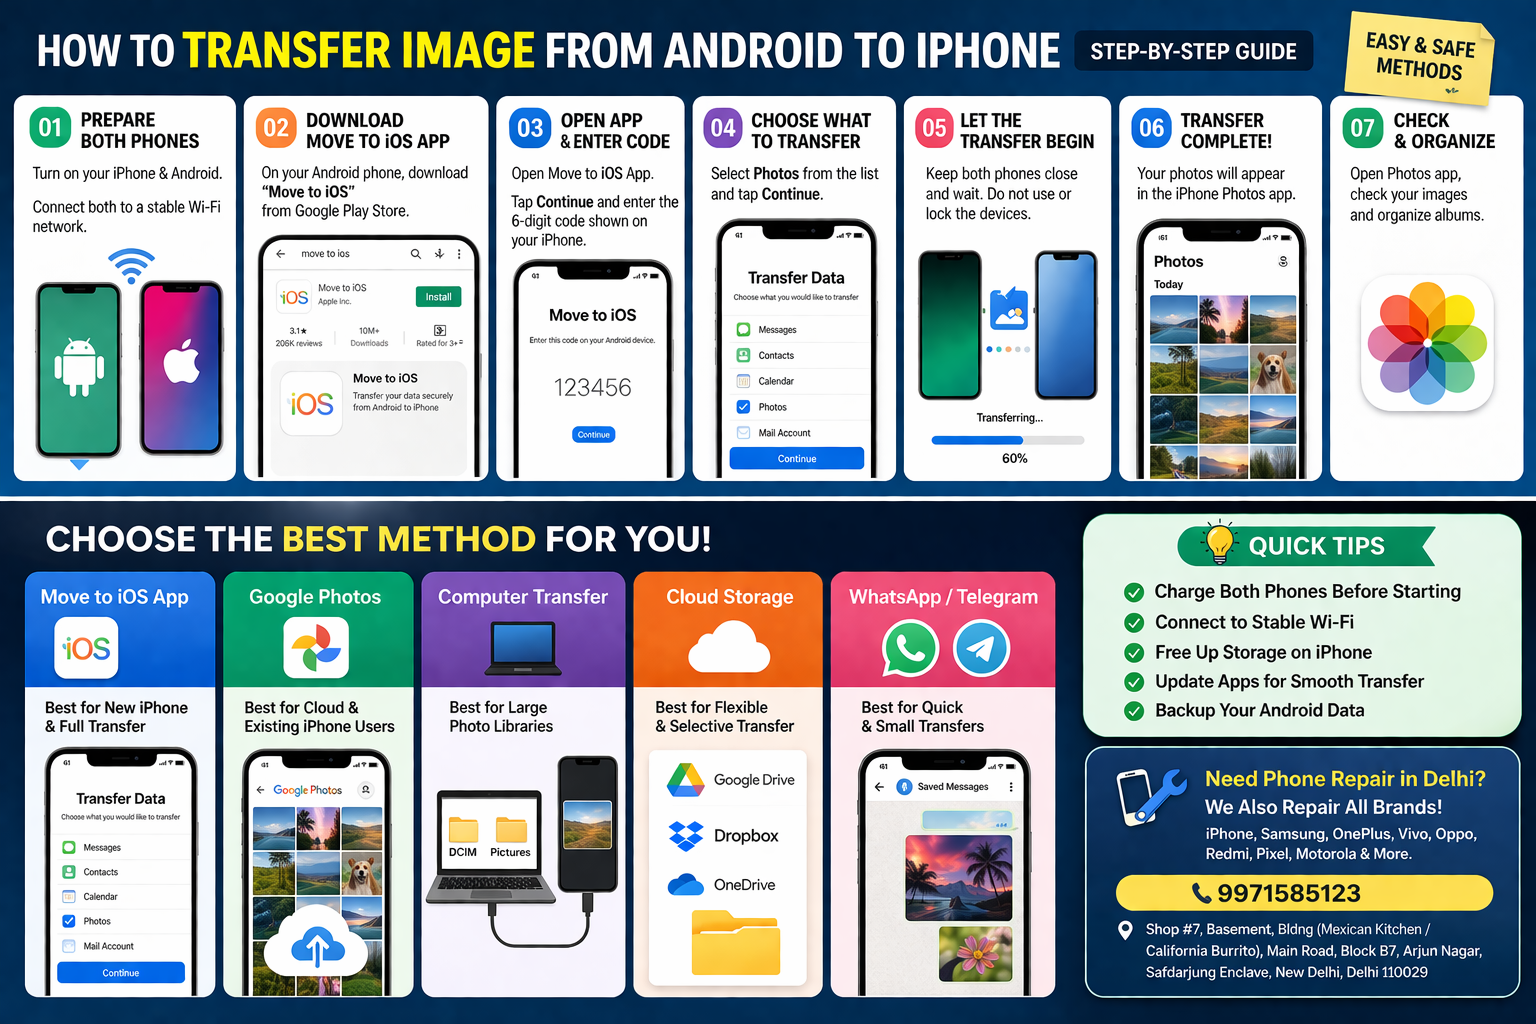
Things to Do Before Transfer
Before starting photo transfer:
✔ Charge both phones
✔ Connect to WiFi
✔ Free enough storage on iPhone
✔ Update apps
✔ Backup Android data
How Long Does Android to iPhone Photo Transfer Take?
Depends on:
- Number of images
- Video size
- Internet speed
- Transfer method
Approx Time:
- 500 photos = Fast
- 5000 photos = Moderate
- 20,000+ media = Longer time
Common Problems While Transferring Images
1. Transfer Stops Midway
Solution:
- Keep both devices charging
- Use stable WiFi
2. Photos Missing
Solution:
- Recheck Google backup
- Use manual transfer
3. Duplicate Images
Solution:
- Use album sorting apps later
4. Storage Full on iPhone
Solution:
- Remove unwanted apps/files first
Which Method is Best?
For New iPhone Users:
👉 Move to iOS
For Existing iPhone Users:
👉 Google Photos
For Full Control:
👉 Computer Transfer
For Small Number of Photos:
👉 WhatsApp / Cloud Apps
Tips After Transfer
After successfully moving images:
✔ Organize albums
✔ Delete duplicate files
✔ Enable iCloud backup
✔ Keep Google Photos backup active
✔ Create folders for family/work/travel
Why People Shift from Android to iPhone
Common reasons:
- Better camera
- Smooth performance
- Premium ecosystem
- Better resale value
- Security features
- Long software updates
Bonus Tip: Need Phone Repair While Switching?
Sometimes users shifting devices face problems like:
- Broken screen
- Battery issue
- Charging port problem
- Data transfer issues
- Water damage
- Old phone resale preparation
At Toughees Telecom, we also provide trusted repair services across Delhi for customers using iPhone, Samsung, Oppo, Vivo, OnePlus, Realme, Pixel and other devices.
We help with:
- Screen repair in Delhi
- Battery replacement in Delhi
- Charging issue repair
- iPhone repair in Delhi
- Samsung repair in Delhi
- Data migration guidance
Contact for Device Support in Delhi
📞 Phone: 9971585123
📍 Address:
Shop #7, Basement, Bldng (Mexican Kitchen / California Burrito),
Main Road, Block B7, Arjun Nagar, Safdarjung Enclave,
New Delhi, Delhi 110029
Frequently Asked Questions (FAQs)
1. How to transfer image from Android to iPhone easily?
Use Move to iOS or Google Photos.
2. Can I transfer all photos from Android to iPhone?
Yes, full gallery transfer is possible.
3. Do I need internet?
For Google Photos yes, for cable transfer not always.
4. Which app is best?
Move to iOS for new iPhone users.
5. Can I transfer WhatsApp images too?
Yes, depending on method.
6. Will photo quality reduce?
Usually no, if proper methods are used.
7. Can I transfer videos also?
Yes.
8. Is Google Photos safe?
Widely used and reliable.
9. What if transfer stops?
Retry with stable WiFi.
10. Do you provide phone repair in Delhi?
Yes, Toughees Telecom offers repair services across Delhi.
Final Words
If you were wondering how to transfer image from Android to iPhone, now you know there are many easy options. Whether you choose Move to iOS, Google Photos, computer sync, or cloud storage, the process is simple when done step by step.
Choose the method that suits your needs and enjoy your new iPhone with all your memories safely transferred.